Installing Custom Fonts
- The Automation Guy

- May 17
- 2 min read
Scenario:
The marketing department at your organization recently purchased a set of fonts to be used in future promotional flyers. You have been tasked with installing the new fonts for on all marketing devices.
Environment:
All your devices are EntraID joined and are on Windows 11. Users do not have administrative rights to their devices, and you use Intune to manage your Windows devices.
Tactic:
Since you must provide the font files during the installation, you have decided the best approach is to write a PowerShell script to install the fonts, and deploy the script as a Win32 app in Intune.
The Script:
The below script will copy the fonts to the device, update the registry, and log all actions and errors:

Intunewin File:
We need to create our package directory where the intunewin file will be created. This directory must include the fonts we want to install as well as the above script. I like to also create a text file with the install command in this directory. It is useful when updating the package in the future, but not required.

When the package directory is ready, you can create the intunewin file using the Microsoft Win32 Content Prep Tool.
Simply invoke the tool, then specify the path to the above directory as the source folder, the installer script as the setup file, the above folder again as the output folder, and N for the catalog folder:

The intunewin file be created in our package directory:

Intune Windows App:
In Intune, go to your Windows apps and create a new Windows App (Win32 app):
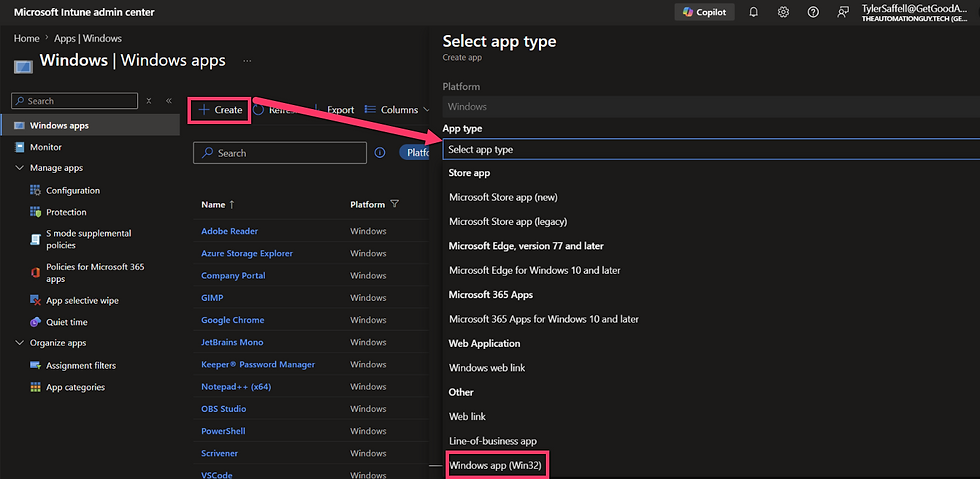
Upload the intunewin file and fill out the required & optional fields:

We need to specify both an install and uninstall command. We are not going to bother with an uninstall script at this time, so we are just going to enter the install command for the uninstall command.
We do not want to allow users to uninstall and we want the script to run as System. Finally, we want to specify "No specific action" for Device restart behavior.

I won't go into detail for the requirements settings, just select a version of Windows that makes you happy (probably no versions of Windows make you happy, but you know what I mean).
Once the requirements settings are good, we need to define the detection rule. We will create our own using Manually configure detection rules for the Rules format. We will add a new rule using the below settings.
Rule type: File
Path: C:\ProgramData\Microsoft\IntuneManagementExtension\Logs
File or folder: JetBrains_Install_Status_Success.txt
Detection method: File or folder exists
Associated with a 32-bit app on 64-bit clients: Yes

If you use a different font, your detection file will instead be:
<Font_Name>_Install_Status_Success.txt
I won't go through the rest of the configuration settings as the only remaining settings that matter are the assignments and only you know which devices to assign these to. Once you have selected the proper assignments, you can deploy the app. If there are any issues with the installation, you can view the log files to help troubleshoot.
You can download the font installer script here.
Please verify hash to ensure file integrity.
SHA256:
098527FE844680F800E3E7AC147EFDB343E72CC50ED7DE38A79A02868D392744
Comments